How to Measure
Ensure your remodeling project fits perfectly by mastering the art of accurate measurements. Follow our easy guide to measure your kitchen or bathroom like a pro, setting the stage for a seamless renovation.
How to Measure
How to Sketch Your Floor Plan for a Streamlined Design Process
Welcome to Destination Cabinets’ measurement guide. Accurate measurements are the cornerstone of any successful kitchen or bathroom remodeling project. They ensure that your new fixtures and cabinets fit perfectly into your space, avoiding costly adjustments and delays. This guide will walk you through the process of measuring your space accurately, empowering you to take the first step toward transforming your home.

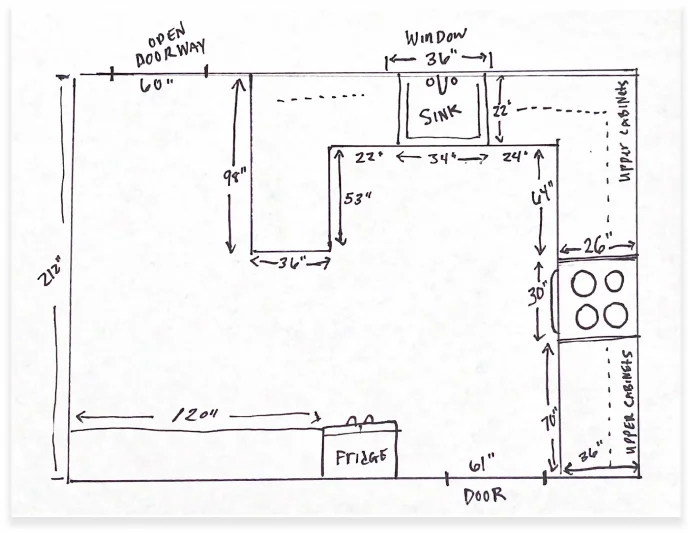
At Destination Cabinets, we find that working from a sketch of your floor plan often proves more efficient than using a detailed architectural floor plan. Sketches allow us to focus on the actual measurements that are crucial for your kitchen cabinet or bathroom vanity design, speeding up the design process significantly.
Step-by-Step Guide to Measuring Your Kitchen for a Remodel
- Sketch Your Space: Draw a rough sketch of your kitchen or bathroom layout. Identify whether your kitchen is U-shaped, L-shaped, or a galley style, and note any islands or peninsulas.
- Measure Wall Lengths: Begin at the left corner of each wall and measure across to the far right corner. Record every measurement in inches directly on your sketch.
- Detail Openings: Measure from the left corner to the edge of each opening, like windows and doors. Note these on your sketch as well.
- Measure Opening Widths: For each opening, measure from the outside edge of the trim on one side to the outside edge of the trim on the other side.
- Locate and Measure Fixed Elements: Mark the exact location and size of the sink on your sketch, measuring to the center rather than the edge. Also, measure all appliances, including the stove, refrigerator (noting the height), microwave, and dishwasher.
- Ceiling Height: Measure the height from the floor to the ceiling and document this on your sketch.
- Repeat for All Walls: Apply these measurement steps to all walls in your kitchen, ensuring all dimensions are captured accurately on your sketch.
Additional Tips for a Seamless Measurement Experience
Tools Needed
To start, you’ll need the following tools:
- Measuring Tape: A metal measuring tape is recommended for accuracy.
- Notepad and Pencil: For recording the measurements.
- Laser Measure: Optional for more precise measurements.
- Level: To ensure your measurements account for any uneven floors or walls.
- Camera/Smartphone: To take pictures of the space for reference.
Accurate Measuring
Ensure the best results with these measuring tips:
- Measure Twice: Always double-check your measurements to avoid any mistakes.
- Consistent Units: Use the same unit of measurement throughout to maintain consistency.
- Extend the Tape: Make sure the tape measure is flat against surfaces for straight lines and tight (not sagging) for accurate readings.
Safety Precautions
Safety is paramount when measuring your space. Keep these precautions in mind:
- Clear the Area: Remove any furniture or obstacles to ensure a safe measuring environment.
- Stable Support: Use a sturdy ladder or step stool rather than furniture when reaching high places.
Tool Safety: Keep sharp tools like scissors or utility knives out of reach of children.
Troubleshooting Common Issues
Avoid common pitfalls with these solutions:
- Forgetting Spaces: Don’t overlook measuring door and window openings, and consider the swing of the door.
- Ignoring Obstacles: Account for any immovable objects like columns or fixed appliances.
- Vertical Measurements: Check the room’s height, as well as the distance between windows and floors or counters and upper cabinets.
Schedule Your Free Consultation Today
Schedule Your Dream Kitchen Consultation
Ready to turn your dream kitchen into reality? Schedule your free consultation today!

